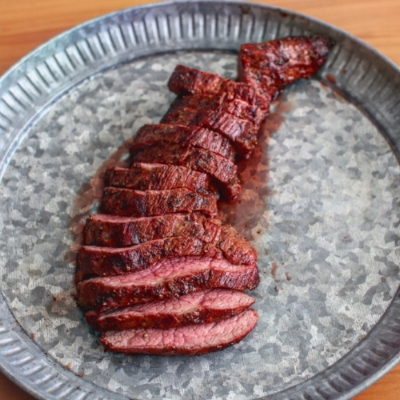
How to: Reverse Sear Tri-Tip on the Weber Kettle
The next instalment in a series of guides on the reverse sear, this article covers how to reverse sear a tri-tip on the Weber kettle.
The aim of this series is to show you how to reverse sear a variety of cuts on a variety of BBQs so that you can impress your friends with the perfect steak every time.
The previous instalment was: How to Reverse Sear a Ribeye on a Pro Q which covers a bit more on why we reverse sear. Mix and match the techniques and cuts from these guides as required.
What is tri-tip?
The tri-tip is a beef cut that is a triangular muscle from the rear of a cow, it runs from the kneecap (pointy end) to the gluteus groups (fat end). It’s a single muscle so there’s no seams or sinew inside.
Tri-tip is one of my favourite quick things to barbecue, it’s priced like a secondary cut but is full of flavour and when treated right is as tender as any higher priced steak. You can also get it done in close to an hour so it’s great for mid-week dinners. In fact I probably should have kept this to myself because the price will go up now!
The tri-tip pictured above is 960g, the ones I buy tend to sit within that range of around 900g to 1.1kg. If you are reading any US recipes you will find their cuts, as with many of their cuts tend to be larger.
I don’t usually do a lot of prep with my tri-tip, especially if it’s for a mid week dinner, but I do like to get rid of the silver skin as it makes for better eating. There’s also been many times where I’ve been in a rush and just put it straight on – still great eating, but there’ll be a couple of chewy bits.
The Method
Set up your Weber for indirect cooking – I fill one charcoal basket, which will give you an approximate grill temp of 250f.
Season your tri-tip and place in the Weber on the opposite side to the charcoal. I usually point the fat end a little closer to the charcoal as it will need to cook more.
If you want to add some smoke to your tri-tip place a chunk of wood on top of your coals, I used pecan.
On seasoning, by now you know my rule, if it’s your first time trying reverse sear or tri-tip just use salt and pepper, but beyond that experiment away! Our winning tri tip at Beer and Beef Festival used a coffee based rub.
Internal Temperature
A lot of people are very defensive about their steak doneness, “I’m a medium rare guy” et cetera. But I believe that in addition to personal preference some steaks respond better to a certain doneness than others. If I got my hands on some wagyu eye fillet you’d best believe that will be rare.
I have found that tri-tip seems to respond best to medium, which is around 140f (60c) internal temperature.
Because we are using the reverse sear method we get that doneness throughout rather than just at the centre when you cook the shit out of your steak on a hot grill.
I think I’m going to have to put the “no steak” in every reverse sear article – don’t settle for over done on the outside, perfectly done for a tiny band in the middle – we’re better than that!
For our reverse sear we remove the steak from indirect at 10f or 5c below the target temperature, so in this case we remove the tri-tip at 130f (55c).
It took around 50 minutes to reach 130f internal temperature.
Once the tri-tip has hit your target temp it’s time to sear. If you need to boost your coals a bit, wrap your tri-tip in foil to keep warm while you get them fired up. This particular cook they probably could have been a touch hotter but they got the job done.
After hitting internal temp on the indirect I don’t bother checking temperatures again, what I am aiming for on the sear is to simply get the colour and maillard reaction that I am chasing (the crunchy goodness on the outside). You don’t want to take too long and end up like the ‘no steak’.
Resting
Once you’re happy with the colour take off the tri-tip and it’s ready to slice.
Reverse seared steaks do not need to be rested like traditional steaks due to having been slowly brought to the correct internal temperature.
The grain typically runs lengthways, we want to slice across the grain.
The Results
Why do we reverse sear? This is why we reverse sear.
Edge to edge doneness just the way you like it.
Any questions or comments let me know – if you haven’t tried reverse searing or tri-tip get amongst it! Don’t be like the no steak!
Check out my other guides:


